
I love PCEngine’s boards, so I always have a couple lying around. In fact an APU with an AMD G-T40E CPU and 4G RAM running Linux is my home router for the past 6 years. I always had a mind to replace it with an OpenBSD one, so last Saturday I started building one, and after some trial and error, this is how it worked. And to the obvious question of why would a sane person insert an extra router to a home network, features, I say.
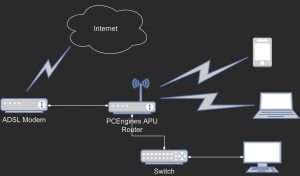
The network diagram is simple; it’s a home network after all. An ADSL modem/router with some ethernet interfaces, one of them connected to the APU. The APU connects to the internet via the modem using pppoe and all other devices either connect to the APU using wireless or via an ethernet switch.
What needs to happen goes like this: the internet connection needs to be started and some firewall and/or routing rules need to be be applied; a DHCP server will give out IP addresses to the wired and wireless clients; a wireless access point need also be configured; a DNS server will be good to have, but not imperative -the clients can always be configured to query an external DNS. Many ISPs offer IPv6 connectivity too and the clients should be presented at least with such an offer. Something needs to monitor the internet connection and try to reconnect if needed.
The APU board provides 3 ethernet interfaces (em0 -next to the USB ports-, em1, em2) and can be fitted with a wireless board. The one I have came with an Atheros chip, and OpenBSD presents it as athn0. What will happen is, em0 and athn0 will be bridged in bridge0. In OpenBSD a bridge cannot be assigned an IP address, so a vether interface, vether0, will join the bridge and be configured with an IP address (192.168.1.5/24). The middle interface, em1, will be connected with the ADSL modem and will be configured dynamically with pppoe.
First, the simple things. A pppoe interface (pppoe0) connecting ethernet port em0 of the APU to an ethernet port of the xDSL router. Create /etc/hostname.pppoe0 and put the following in it:
inet 0.0.0.0 255.255.255.255 NONE \

pppoedev em1 authproto chap \

authname 'my_isp_user_name' authkey 'my_isp_password' up

dest 0.0.0.1

inet6 autoconf

!/sbin/route add default -ifp pppoe0 0.0.0.1

!/sbin/route add -inet6 default -ifp pppoe0 fe80::%pppoe0

!/sbin/pfctl -f /etc/pf.conf
Create /etc/pf.conf and put the following in it:
ext_if="pppoe0"

int_if="vether0"

icmptypes="echoreq"

table persist

table persist

table persist

table persist

#scrub in

set skip on lo

block return # block stateless traffic

pass # establish keep-state

match out on $ext_if inet from $int_if/24 to any nat-to $ext_if

#pass out on $ext_if inet6 from $int_if to any

pass out on $ext_if inet6

#pass out on $ext_if from 192.168.1.0/24 to any nat-to $ext_if

pass in on $int_if from $int_if/24

block return in on ! lo0 proto tcp to port 6000:6010

block return out log proto {tcp udp} user _pbuild

pass in on $ext_if inet6 proto icmp6 all icmp6-type { routeradv neighbrsol neighbradv }

pass in on $ext_if inet6 proto udp from fe80::/10 port dhcpv6-server to fe80::/10 port dhcpv6-client no state
Internet connectivity has not been established yet and even if there had been, I have not defined any name servers. So, edit or create /etc/resolve.conf and put a name server or two in it:
nameserver 8.8.8.8

nameserver 1.1.1.1
Now a basic level of functionality should be available, if only the board connects to the internet. Time to type:
sh /etc/netstart pppoe0
and hopefully a new interface should be created named pppoe0 and an IP address should be assigned to it. A good start.
Some extra packages will be needed, so now that internet is available, it 's a good time to go get them:
pkg_add dhcpcd dnsmasq
dhcpcd is needed only if IPv6 connectivity is desired. Otherwise, dnsmasq should suffice. If dhcpcd is not installed, the line !/etc/rc.d/dhcpcd restart from /etc/hostname.pppoe0 should be removed. Having said that, if you still wish to have IPv6 addresses in your LAN, create /etc/dhcpcd.conf and put the following in it:
hostname bbj.room.mikroskosmos.gr

allowinterfaces pppoe0

interface pppoe0

ipv6only

ia_pd 1 vether0

duid

persistent

vendorclassid

option domain_name_servers, domain_name, domain_search

option classless_static_routes

option interface_mtu

option host_name

option rapid_commit

require dhcp_server_identifier

slaac private
If IPv6 is desired, the rad daemon should also be started.
The board should have internet by now, but no clients can connect yet. An SSID, a DHCP server and dnsmasq must be configured before any clients can connect. DHCP first. Create /etc/dhcpd.conf and put something along these lines in it:
authoritative;

default-lease-time 36000; # 1 hour

max-lease-time 432000; # 12 hours

option domain-name "room.mikroskosmos.gr";

option routers 192.168.1.5;

option domain-name-servers 192.168.1.5;

option broadcast-address 192.168.1.255;

subnet 192.168.1.0 netmask 255.255.255.0 {

range 192.168.1.40 192.168.1.59;

option routers 192.168.1.5;

}
A bridge (bridge0) with an ethernet interface (em1) and the wireless interface (athn0). Create "/etc/hostname.bridge0" and put the following in it:
add vether0

add em0

add athn0

up

!/etc/rc.d/dnsmasq restart
Time to configure the wireless interface. Create /etc/hostname.athn0 with the following lines:
nwid megaloskosmos

chan 9

mode 11g

mediaopt hostap

wpa

wpakey 4140280137537016

wpaprotos wpa2

up
Then create /etc/hostname.vether0 and add the following lines:
inet 192.168.1.5/24

inet6 autoconf
And lastly create /etc/hostname.em0 with just the word up in it:
echo up > /etc/hostname.em0
At this point the bridge interface should be configured and ready to be started:
sh /etc/netstart bridge0